
Are you getting a fillings?

Your tooth need fillings because they are broken or cavitated. Hole forms in a tooth, our body cannot repair it. But many people avoid from getting their dental fillings done due to scare of dental fillings and fear of unknown. Now, ASKDENT would like to help you understand exactly what happens when you go to the dentist for a filling and be prepared.
STEP 1: Prepare for INJECTION
 |
Before the dentist start drilling your tooth, they will give
injection to numb the tooth, so you won't feel pain during
the drilling proceudre
|
The first step when getting a filling is to make sure that you are not feeling any pain during the procedures. We dentists usually give an injection (anaesthetic) to numb the tooth, and eliminate pain, but getting “the INJECTION” is usually the biggest fear for people.
I like to call injection “sleepy juice” especially when i'm dealing with kids because it puts your teeth and nerve “to sleep”. The anesthetic prevents the pain signal from the teeth to reach our brain- and as a result, you will feel no pain! Everyone scared about injections because it is painful, but the truth is that the amount of pain you experience during an injection will largely depend on the skills of your dentist.
The first thing I do when numbing a patient for a filling is to dry the area where the injection will be given. I do this by lightly spraying air inside their mouth. Then, I put numbing gel (topical anesthetic) over the area. We dry the area first so that the numbing gel will soak in faster and deeper.
After the numbing gel has had a minute or two to work, then only I give the patient the injection. If the numbing gel has soaked in fairly well, you will barely notice the injection.
With the advance in technologies, the new invented product DentalVibe can deliver a comfortable, less hurting injection.
With the advance in technologies, the new invented product DentalVibe can deliver a comfortable, less hurting injection.
Step 2: Getting Your Mouth Ready
Next, Your dentist may place rubber dam to make the filling more efficient. A rubber dam is simply a thin piece of rubber that goes over your mouth and around the teeth where the dentist will be working on. In Malaysia, you hardly see the dentists using it. Some dentist find it troublesome to put it on. For me, I like it!
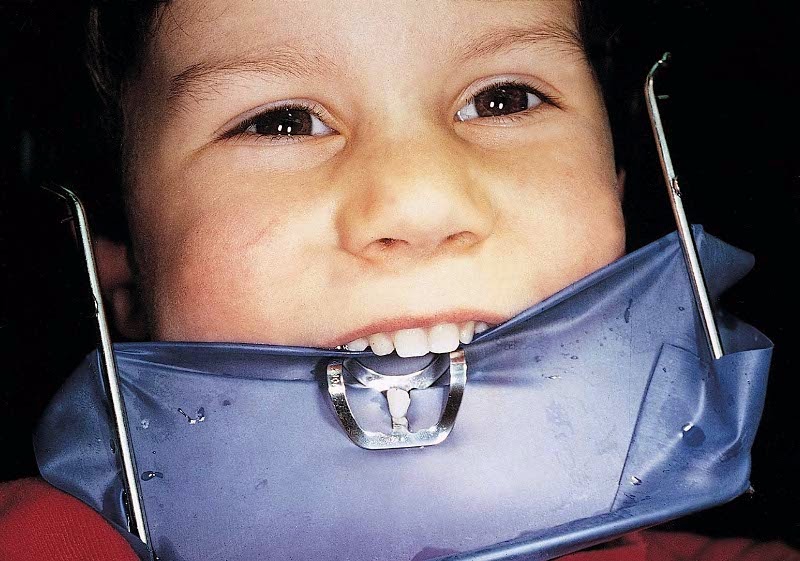 |
A sheet of rubber (RUBBER DAM) is used to prevent
water and saliva contamination on the decayed tooth.
|
 |
This kind of bite block come together with tongue
protector, so your dentist won't accidentally
cut your tongue during drilling.
|
 |
| Shade matching, is choosing the color that is closely matched with your tooth color. |
Step 3: Removing the Tooth Decay
Now the dentist will start to remove the tooth decay. There are a number of tools that are used to clean out the decayed portion of the tooth.
 |
| The Mr. Whistle (high speed drill) and Mr. Bumpy ( slow speed drill) |
While the dentist is using the high-speed handpiece, the dental assistant will be holding the high-volume suction in your mouth. It is like a little vacuum cleaner, helping the dentist to remove the tooth decay debris, and water from your mouth. Another suction you may encounter is the low-volume suction or saliva ejector. This smaller suction is used to remove any extra water that may be in your mouth.
 |
| These spoon-like metal instruments are used to remove remaining tooth decay. |
Finally, the dentist may choose to finish removing decay with some hand instruments. These are simply small, metal tools that the dentist can use to refine the area where the filling will be placed or to remove any remaining tooth decay.
 |
| Laser is the new technology in removing Decay tooth structure. |
Now, the new Laser Technogies is used to replace drilling in removing the decay. It is a good news for those who scared of drilling. However, there are only limited scientific evidence to support that laser treatment is as effective as drilling for removing decay tissues, and it prolonged the treatment time. But, I believe it will get better with future technology advancement.
Step 4: Replacing the Decayed Tooth with a Filling
Next, the dentist will fill the tooth to restore back to its original shape so that you can use it to chew food and speak. The procedures for restoring a tooth with amalgam and composite are slightly different, so we will talk about it in two separate sections. First we'l talk about what happens when you get an amalgam filling; and then what happens when you get a composite filling.
Next, You and your dentist will have to determine which filling material to be used. How to choose the type of filling? Read here:)
 |
| The two types of fillings which are commonly used, White filling (composite resin) and Silver Metal filling (amalgam). |
Getting an Amalgam/Silver Filling
If your cavity is huge, deep and close to the nerve of the pulp, your dentist will put liners on top of it to provide healing, and protect the pulp.
 |
| In deep cavity case, dentist will put a layer of lining and sublining to protect the pulp underneath, and promote healing |
If your cavity is on the center of the biting surface of your tooth, then your dentist will place the silver filling straight in to the prepared cavity. If your cavity is between two teeth, the dentist will place a metal band (called a matrix band) tightly around the tooth to help build the wall of the tooth back up. Your dentist will also place a wedge between the two teeth so that when the filling is completed the neighboring tooth and the new filling will touch together but not sticking to each other, prevent food from getting caught between the two teeth when you chew, and prevent gum swelling underneath the filling.
Here a few example of faulty filling which is done without matrix band been placed.
Then the dental assistant will mix up the amalgam. We use a machine that rotates a capsule of unmixed amalgam very fast. It does make a loud vibration noise. I’ve found that many patients turn around to see what’s going on when we mix the amalgam. It needs to go fast because the mercury is sealed in a plastic pouch and the machine has to break the mercury out of the pouch and mix it up with the other metals. By using the mixing machine, the mercury evaporation is much lesser compared to the manual mixing during old days.
 |
| A matrix band is placed tightly around the teeth to help build the wall of the tooth back up, preventing the filling from sticking to neighbor tooth. |
Here a few example of faulty filling which is done without matrix band been placed.
 |
| This is a amalgam filling with excess at the gum margin, and it causes gum swelling and bone resorption underneath |
 |
| The unmixed amalgam capsule is placed into the mixer, and the mixer will vibrate to mix the amalgam. |
After the amalgam is compacted, the dentist will carve the amalgam to carve and make it look like a tooth.

When that is finished, your dentist will have you bite down on a thin sheet of carbon paper. This helps us to see if the filling is too high. The carbon paper rubs off onto the filling and shows the dentist where he or she needs to lower the filling.
When that is finished, your dentist will have you bite down on a thin sheet of carbon paper. This helps us to see if the filling is too high. The carbon paper rubs off onto the filling and shows the dentist where he or she needs to lower the filling.
Once that’s done, I usually ask my patient if the filling feels alright. The only problem is if they are still numb, it is hard to tell.
Getting a Composite Resin/ Tooth Color Filling
There are several similarities between the process of receiving a composite resin filling and an amalgam filling. Just like when you get an amalgam filling that is on the edge of one tooth that touches another, the dentist will need to place a band around the tooth and a wedge between the two teeth. The main difference in this part is that the band is a clear band instead of metal. This allows the curing light (mentioned below) to shine through the band since the light can’t pass through metal. Failed to placed the band will cause the filling materials to flow excessively in between the teeth, and stick to the neighbor tooth. Below is an example I found on one of my patient:
 |
These are faulty restoration done by a dentist. The
fillings were simply placed without a band been used. Thus
the fillings were stick to the teeth, causing the gums swelling
underneath the fillings and foul smelling.
|
The dentist will then rinse the acid away. After that, your dentist will dry the tooth and place a tiny amount of priming and bonding agent to the tooth with a tiny brush. The priming and bonding agent helps form a strong bond between the tooth and the eventual filling.
 |
| [video] Composite Filling, step by step |
Next the dentist will use the previously selected shade of composite resin filling material and put it inside of your tooth. Depending on the technique your dentist prefers, he or she will either squirt it directly into your tooth or put it on a small metal instrument used to place it in your tooth. After this, the dentist will make sure that the composite is evenly spread out in your tooth and that there are no air bubbles. Then the dentist will shine a bright blue light (similar to the one in the photo) on the composite which will harden it and make it very strong. This process is known as curing the composite. Since the light doesn’t penetrate the composite very deeply, your dentist may have to apply and cure multiple layers of composite if you had a deep cavity.
 |
| After the composite placed into the cavity, dentist will shine a bright blue light to harden the composite filling. |
Finally, if there are any rough spots on the filling, the dentist can use some mild abrasives to smooth the filling and to make it feel smooth to your tongue.
Q: How Do You Know If Your Filling is Too High?
After the filling is finished, you may feel some sensitivity in your tooth for a few days. If the tooth starts feeling sensitive only when you bite down, you should go back and see your dentist as this could be a sign that your filling is too high. Your dentist will be able to check your bite again and then smooth down the filling using some specialized attachments to the high-speed handpiece. Since your dentist should only need to smooth down the filling and not your tooth, you won’t need to be numb for this.
Congratulations — You’re Done!
That’s all for getting a filling! In conclusion, I want to mention something that many dentists fail to discuss with their patients: There is a reason that you needed a filling!
You need to determine why you got a cavity in the first place, and decide how to fix it. There’s probably something you can do to prevent future cavities. Making changes to your diet and oral hygiene habits now can prevent the need for future fillings. Many people do not realize that it is the frequency of sugar intake, rather than the quantity, which can cause cavities.
Hopefully this article has helped to ease some of the fears you may have about getting a filling. Many people find that the actual experience is much better than they had anticipated.
